
How to beat the Pufferfish: shark feast and endangered fish quests, carrot bait trigger, and an SMG strategy for the tankiest boss.
How to Fish Pufferfish Boss: The Tank Check of the Desert
The Pufferfish is Island 3's boss in How to Fish, and it is the fight where under-geared runs go to die. Everything before it forgives sloppy loadouts — the Pufferfish does not. It is tanky, it rolls around like a wrecking ball, its worst hits can one-shot or near one-shot you, and it demands the first real attachment investment of the run. Beat it, and the Island 4 coordinates are yours.
Two Quests Before the Fight
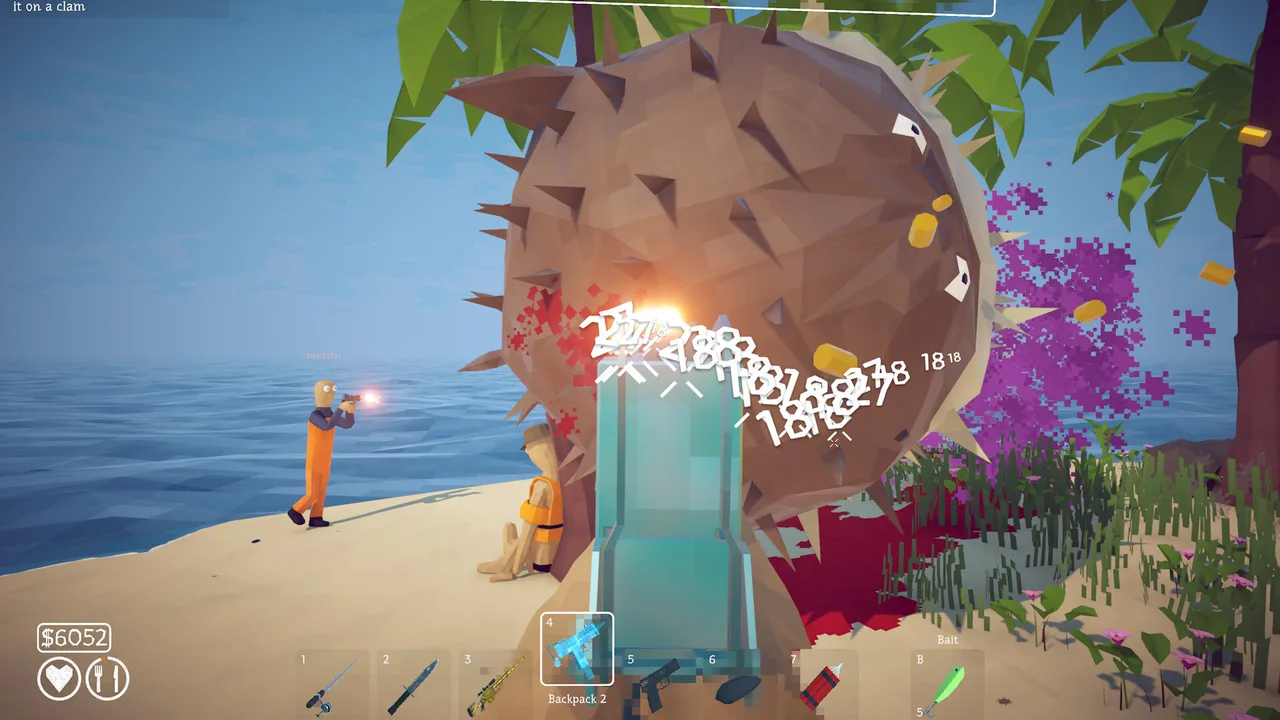
The Desert gates its boss behind two NPC chains, and both pay out beyond the trigger:
1. The Grill Master's Shark
The grill master wants a shark for his party:
- Catch a shark using the island's standard and boss lures
- Cook it before delivery — cooking multiplies value up to about 1.5x
- Watch the heat: overcooking drops the value back down
Complete his request and he leaves you something better than payment: permanent access to the grill. From this point on, cook-before-sell becomes your default money loop for the rest of the run.
2. The Tourist's Endangered Fish
The Tourist is terrified of something in the water and wants an endangered creature delivered:
- Catch the endangered fish (boss-tier lures help)
- Hand it over and receive carrot bait
- The carrot bait is what summons the Pufferfish
Both quests upgrade your economy while gating the boss — skipping them does not just block the fight, it forfeits the grill access that funds everything after.
Loadout: SMG Plus Everything
Per TposeGaming's full guide, this is the fight that justifies the SMG ($650) and every attachment you can afford. The numbers explain why: the SMG starts at 24 damage per shot and its 13-tier upgrade ladder tops out at 70 damage, and it sustains that output far faster than the shotgun's per-pellet economy. If you are deciding where the money goes first, the upgrades guide works through the cost of each ladder step and why the last few tiers cost more than the gun did.
| Attachment | Why It Matters Here |
|---|---|
| Compensator / suppressor | Recoil control during long damage windows |
| Extended magazine | Fewer reloads against a massive health pool |
| Laser / red-dot | Target tracking on a fast-rolling body |
Two caveats before you buy: the spec sheet above is the shortlist, not the full list — the weapon attachments guide covers all seven parts, which island each one unlocks on, and the 1.0.11 change that removed the iron sight from the shops. And the prices are per weapon, so check the attachment counter while holding the gun you actually want to fit.
Extra inventory slots are also worth buying on Island 3 — boss trophies plus cooked stock pile up fast.
The upgraded shotgun remains serviceable as a backup, but the Desert's health pools punish shotgun-only runs with marathon fights and drained white escape bars.
The Fight: Patience Against a Rolling Tank
The Pufferfish's kit is simple and brutal:
- It rolls. A rolling hit connects for 34 contact damage — enough to one-shot or nearly one-shot an unprepared player
Pufferfish Stats
| Stat | Value |
|---|---|
| Base health pool | 18,000 HP — twelve times the Giant Piranha |
| Contact damage (the roll) | 34 |
| Escape timer | 300 seconds |
| Endangered Species flag | yes — the game literally tags this fish endangered, matching the Tourist's quest |
| Sell value of the fish itself | $12,000 before weight/cooking multipliers |
Shots to Kill: The Exact Number
Using base-damage weapons, killing the Pufferfish takes:
| Weapon | Shots to Kill |
|---|---|
| Pistol (25 dmg) | 720 |
| Shotgun (3 per pellet) | 6,000 |
| SMG (24 dmg) | 750 |
| Sniper Rifle (200 dmg) | 90 |
| Assault Rifle (40 dmg) | 450 |
| Knife (16 dmg) | 1,125 |
Not sure your SMG is enough? The boss kill calculator shows exactly how many shots each weapon level needs on the 18,000 HP Pufferfish.
Upgraded weapons cut these proportionally — a level-4 Sniper (240 dmg) kills it in 75 shots instead of 90. Full ladders are on our weapons unlock guide, and every base value is from the fish stats table.
That health pool is the whole fight in one number. The upgraded shotgun eventually gets there; a 24-to-70-damage SMG with recoil attachments gets there before the white bar does.
- It inflates between movement phases, telegraphing its windows
- It zooms — late-fight speed-ups catch stationary players
The winning pattern, per TposeGaming's breakdown:
- Do not stand still. Ever. Stationary players eat roll hits; constant repositioning is the whole defense
- Use knockback. Shotgun and SMG fire can interrupt its rolls mid-buildup — a stopped puffer is a free damage window
- Chip between phases. Damage comes in increments during inflate/deflate transitions, not sustained trades
- Keep cooked food on the ground nearby so you can heal mid-fight without a detour to the shop
- Respect the white bar — the same escape timer as every boss; slow play loses fights you were winning
The one-shot threat is real. If you enter the fight hungry or already damaged, fix that first — per Whisperofthehouse's boss guide, entering fights at half-strength is spending money on the wrong problem.
After the Kill: Tail In, Coordinates Out
The Pufferfish drops its named trophy — the tail — which hands in through the Desert's quest chain for the Island 4 coordinates. Same contract as always: kill, keep the uniquely named drop, return it to the right NPC. Sold or eaten tail means re-running the entire trigger sequence (shark, endangered fish, carrot bait, fight).
With coordinates secured, the next stop is the Rocks — where the Terrorizing Bird waits, and where the Sniper Rifle finally earns its shelf space. Our full boss guide covers the remaining route.
Pufferfish by the Numbers
The Pufferfish is the first boss that checks your gun rather than your reflexes, and the health gradient around it shows exactly where that check lands.
| Boss | HP | Contact Damage | Base Value | Value per HP |
|---|---|---|---|---|
| Spider Crab | 750 | 0 | $10,000 | $13.33 |
| Blue Shark | 2,300 | 36 | $300 | $0.13 |
| Giant Piranha | 2,500 | 32 | $11,000 | $4.40 |
| Tuna | 6,000 | 40 | $2,000 | $0.33 |
| Goblin Shark | 7,500 | 25 | $6,200 | $0.83 |
| Albatross (Terrorizing Bird) | 7,800 | 0 | $13,000 | $1.67 |
| Pufferfish | 18,000 | 34 | $12,000 | $0.67 |
| Bowhead Whale | 20,000 | 28 | $8,000 | $0.40 |
| Mutated Bowhead Whale | 38,000 | 36 | $15,000 | $0.39 |
Three things fall out of that table:
- The jump from Giant Piranha to Pufferfish is 7.2x health. No other single step in the game scales that hard, which is why this is the fight where "bring more gun" stops being advice and becomes a requirement. Across the whole campaign the ramp runs 750 HP to 38,000 — a factor of just over 50.
- Its contact damage is not the scary number. At 34 it sits below the Tuna's 40 and barely above the Bowhead Whale's 28. What kills players is frequency, not per-hit size: 34 damage lands over and over while you are trying to place 750 base-damage SMG shots into an 18,000 HP pool.
- Value per HP says this is not a farming target. The Pufferfish pays about $0.67 of base value per point of health, while the Albatross pays $1.67 and the Giant Piranha pays $4.40. Fight the Pufferfish once, for progression and the Fishipedia entry — not in a loop.
One clarification that trips people up: the $12,000 figure is the creature's base value in the game data, before weight and cooking multipliers. The named trophy it leaves behind — the Pufferfish Fin — is tagged as a quest item and sells for nothing, and the meat is worth $200. Trophies are keys, not paydays.
Official source: How to Fish on Steam for the store listing and shop tiers, the official patch notes feed for the 1.0.12 tuna balance pass that shifted this gradient, and SteamDB for build history.
Why Players Lose This Fight
The Pufferfish ends more first runs than any other boss, and the loss causes are consistent enough to list:
- Standing still during inflate phases. The roll punishes stationary targets instantly; movement is not optional at any phase of the fight
- Shotgun-only loadouts. It works eventually — until the white escape bar empties first and the whole attempt resets
- Skipping attachments. Bare-SMG recoil turns half your magazine into scenery; the compensator costs less than the ammo you waste without it
- Fighting hungry or hurt. Entering at half-strength converts survivable hits into run-enders
- Greed after knockback staggers. A stopped puffer is free damage, but two extra shots into its recovery window is how one-shot deaths happen
The fix for all five is preparation rather than skill. Stock attachments, food and patience before the summon, and the fight becomes a checklist instead of a wall.
Co-op Notes
Crews can shorten this fight dramatically with role division: one player kites rolls in open ground while two others unload during deflation from opposite angles. The support slot keeps grilled food stocked at the arena edge — healing rotations matter more against the Pufferfish than any boss before it, because chip damage accumulates fast across long phases.
Cook Timing Practice Routine
Since the Desert hands you both grill access and its first real exam, use the downtime deliberately. Buy three cheap fish, cook each to different doneness, and watch the value curve: raw baseline, proper cook at roughly 1.5x, burnt dropping back toward raw. Two minutes of practice calibrates your internal timer for the rest of the run.
That calibration pays most during boss prep, when grilled healing food gets made in bulk under time pressure. Players who practiced burn nothing; players who guess lose their best catches to overcooking at exactly the moment supplies matter. The shark feast quest doubles as your graduation exam — deliver a properly cooked fish and the timing instinct is yours.
FAQ
What summons the Pufferfish?
The carrot bait, received from the Tourist after delivering an endangered fish. The chain runs Tourist → Endangered Species → Carrot → boss spawn.
Can you beat the Pufferfish with a shotgun?
An upgraded shotgun can do it, but slowly — and slow fights lose to the white escape bar. The SMG with recoil attachments is the reliable answer.
Why does my cooked shark sell for less sometimes?
Overcooking drops the value back down. Cooking multiplies sale price up to about 1.5x — pull it off the grill in time.
More How to Fish Guides
Every fish location in How to Fish: all 54 creatures by island and water depth, bait matching, ripple colors and the nine endangered species.
Every quest chain in How to Fish: clam economy, Beer Can summon, leech delivery, shark feast, endangered fish, tuna offering and the Scientist volcano finale.
Every bait and lure in How to Fish: the free starter, $1 Hotdog Lures, Grubs, Heavy Metal, river and swamp specialty lures and boss lures with tier matching.
Boat upgrades in How to Fish explained: engine and storage parts, the permanent radar mount, why boats come last in purchase orders and when speed pays off.
How to Fish has no console build, so there is nothing to cross: Steam PC, Deck and GeForce NOW players share the same 8-player lobbies. Co-op facts for 2026.
Desert Island guide: the grill master's shark, the tourist's endangered creature, SMG attachment shopping, and beating the Pufferfish.
How to get drip rainbow creatures in How to Fish: what they are, where they spawn, how the Island 4 slot machine turns them into legendary weapon skins.
Dynamite does 200 explosion damage per stick in How to Fish — what that one-shots, how many sticks each boss needs, and the patch 1.0.11 self-damage rule.